Ship a product shell
read as.mdThe agentic-app template scaffolds a product — sidebar navigation, real pages — with the agent built into the shell itself. The base template you met in Your first agentic app puts the agent on a chat page; this one inverts that. Users work in your app and talk to the agent from a chat rail docked in the sidebar; when the agent draws an interactive screen, it takes over the whole canvas.
1. Scaffold with the agentic-app template
Section titled “1. Scaffold with the agentic-app template”npx @guuey/create-agentic-app@latest my-product --template agentic-app --framework claude-agent-sdkAny of the three frameworks works here — claude-agent-sdk, openai-agents-sdk, or google-adk. Pass --framework explicitly; in scripts and CI there is no default (an interactive terminal prompts you).
The scaffolder confirms:
Scaffolded "my-product" in <your path>/my-productand prints the same next-steps flow as the base template, ending in guuey login && guuey deploy and pnpm bootstrap -- --link.
2. What’s different from the base template
Section titled “2. What’s different from the base template”The agent definition is untouched — guuey.json is identical to the base template’s, with the same prompts/system.md, src/ worker, and colocated mcps/todo server. Everything you learned about the agent in the first tutorial still applies. The changes are all in web/. The highlights:
- Added:
components/AppShell.tsx(the split-sidebar shell),pages/Dashboard.tsx,pages/Reports.tsx,pages/TalkOnMobile.tsx(the QR page), andstyles-app.css— plus one dependency,@guuey/mcp-apps-host, inweb/package.json. - Removed:
pages/Chat.tsx— the base template’s dedicated chat page. The rail replaces it: “open the chat” now means entering the app. - Rewired: small edits to
main.tsxandroutes.ts— the product routes move under/app, wrapped in the shell.
3. The shell, anatomically
Section titled “3. The shell, anatomically”The shell (web/src/components/AppShell.tsx) is one split sidebar plus a canvas:
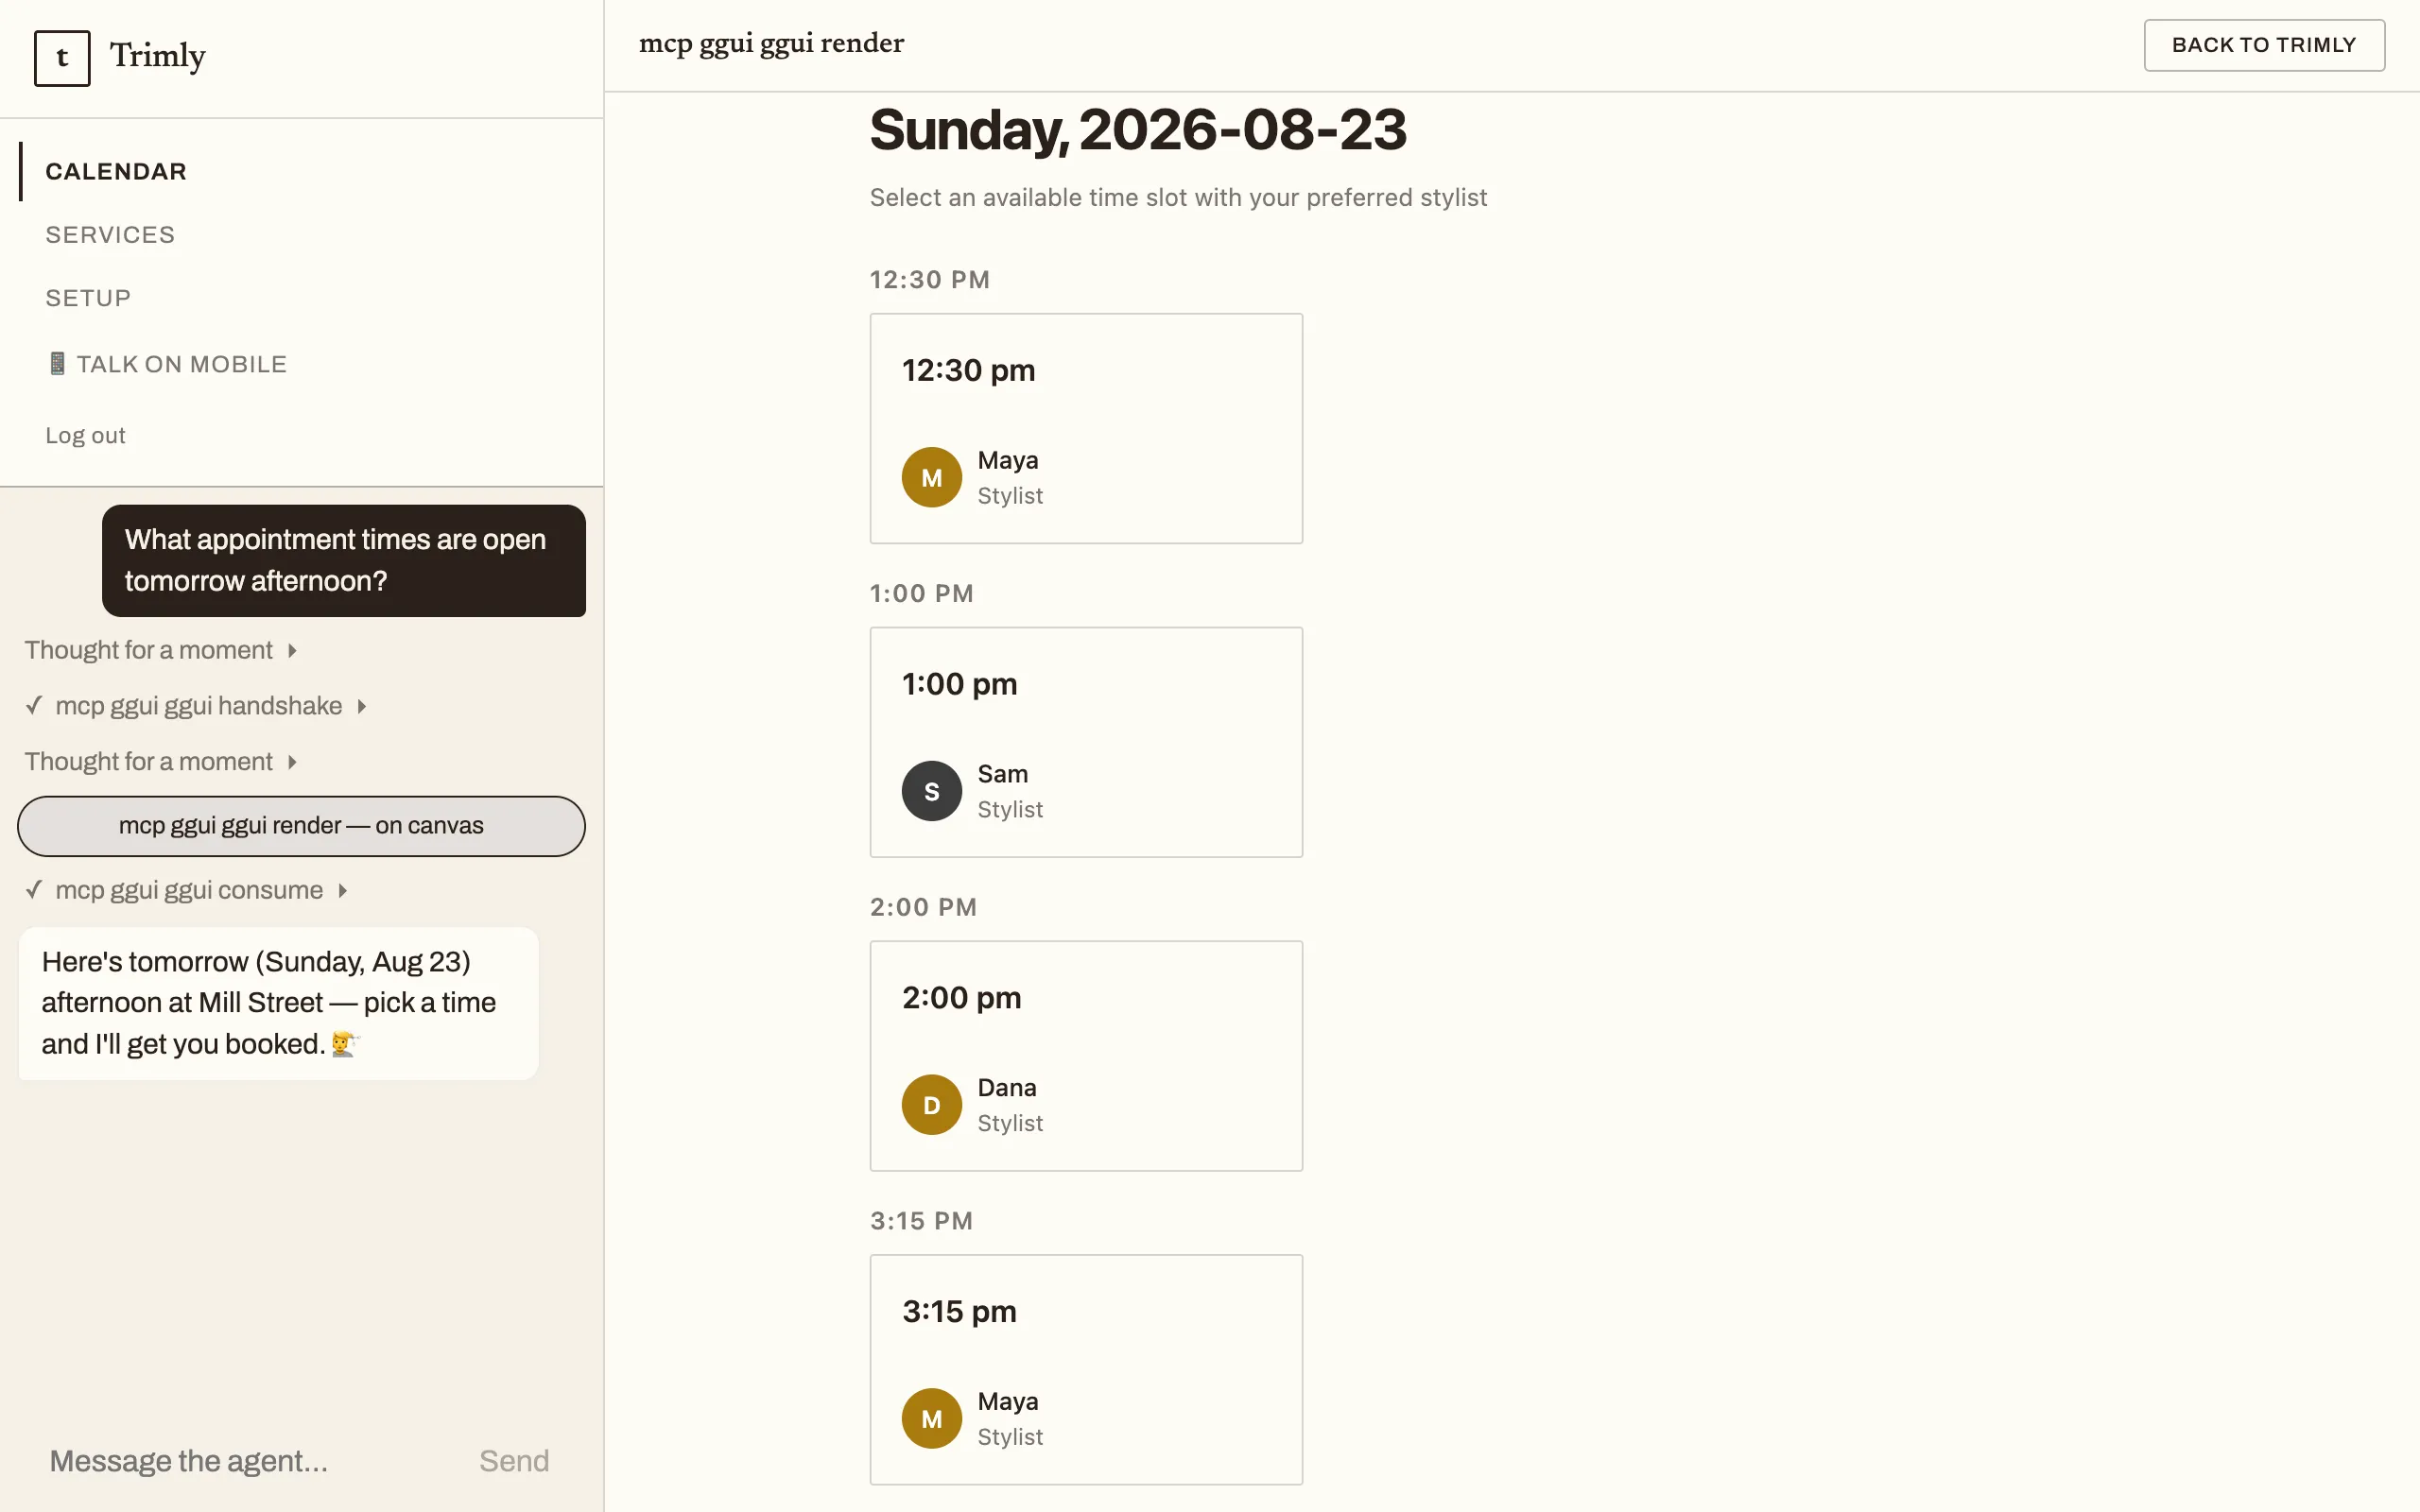
┌──────────┬────────────────────────┐│ ☰ Menu 1 │ ││ ☰ Menu 2 │ MAIN CANVAS ││ ☰ Menu 3 │ your pages — or the │├──────────┤ full generated UI ││ AGENT │ when the agent draws ││ RAIL │ one ││ (chat) │ │└──────────┴────────────────────────┘- Upper sidebar = your product’s menus. The scaffold ships Dashboard, Reports, Setup, and Talk on mobile as placeholders; the canvas renders whichever page is selected.
- Lower sidebar = the agent rail — the chat surface where your users type (the template’s own name for it:
agent-railinAppShell.tsx). Plain text replies stay in the rail. - Generative UI gets the whole canvas. When the agent draws an interactive screen, the render takes over the main canvas at full width, and the rail keeps a compact chip for it. The chips are the history — click one to bring its screen back, like a browser’s back button. Clicking any menu swaps the canvas back to your product pages.
This is the same shell pattern the live Trimly demo runs. Here it is mid-render — menus up top, the agent’s chain in the rail, and a generated slot-picker card owning the canvas:
4. “Talk on mobile”
Section titled “4. “Talk on mobile””The /app/mobile page renders a QR code pointing at the same agent in the Guuey portal — scan it with a phone and talk to the same agent in the portal’s mobile client. Two things to know:
- The QR appears only once the project is linked to a deployed app (
pnpm bootstrap -- --link, step 7). Before that, the page tells you exactly that. - The portal has its own sign-in, so phone conversations are separate threads from the web app’s.
5. Run it
Section titled “5. Run it”Same three commands as the first tutorial — install, bootstrap (the web app is gated on it), dev:
cd my-productpnpm installpnpm bootstrappnpm devpnpm bootstrap prompts for your brand, starting with the app name; pnpm bootstrap -- --yes takes the defaults. The dev stack banner prints its four ports:
agent http://localhost:6790 todo-mcp http://localhost:6782 ggui http://localhost:6781 web http://localhost:6890Open http://localhost:6890, enter the app, and type in the rail. As in the first tutorial: the install and dev warnings you’ll see are benign, and local generation needs a model key in .env.local (it ships empty) — see Your first agentic app for both notes.
6. Make it yours
Section titled “6. Make it yours”The template draws a clean line between your product and the agent surface:
- Your product lives in
web/src/pages/— replaceDashboard.tsxandReports.tsxwith real pages, and add menu entries to the nav inAppShell.tsx. Page styling lives inweb/src/styles-app.css. - The agent surface — the rail and the canvas takeover — is the shell’s job; you rarely touch it. What the agent does is defined exactly as in the base template: instructions in
prompts/system.md, tools inmcps/, worker code insrc/.
7. Deploy
Section titled “7. Deploy”Deployment is unchanged from Your first agentic app — log in, deploy, then link the frontend to the deployed app:
npx guuey loginnpx guuey deploypnpm bootstrap -- --linkLinking is also what lights up the Talk-on-mobile QR code. Every app starts its 7-day trial on first deploy — and it’s one trial at a time: if the first tutorial’s app is still on your account without a plan, creating this second app is refused until you choose a plan for that app — or delete it, which frees the slot right away. See Plans & billing. Full deploy reference: the CLI guide.
What you built
Section titled “What you built”A product shell with an agent inside: your menus in the upper sidebar, a chat rail below them, and a canvas that renders your pages until the agent draws generative UI across its full width — plus a QR handoff to the same agent in the portal. The agent definition itself is byte-for-byte the base template’s, so everything from the first tutorial — prompts, MCP servers, deploys — carries over.
- Start from a real app: Trimly — extract a complete, working example app and re-brand it.
- The portal — where the Talk-on-mobile QR lands.
- Embedding chat — put the same agent on a site you already have.
- CLI guide — the full command surface behind
guuey deploy.